Pages

My attempts at cooking, baking and sharing those experiences with you.

Saturday, February 11, 2012

Valentine's Day Devils Food Cupcakes


So I promised the "evil" portion of my valentine's desserts today. Well, I hate to say these are evil, but they are a chocolate lover's weakness, to say the least. This makes about 32 cupcakes. You can always half the recipe if you'd like. But you do get a bunch!


These are Martha Stewarts. She get's all credit here!

Start with your ingredients: cocoa powder, 3/4 cup hot water, 3 cups of all-purpose flour, 1 tsp baking soda, 1 tsp baking powder, 1 1/4 tsp salt, 3 sticks of butter, 2 1/4 cups sugar, 4 large eggs, 1 tablespoon plus 1 tsp pure vanilla extract, 1 cup sour cream.
Preheat oven to 350. Combine hot water and cocoa powder, whisk until smooth.

In another bowl, whisk together flour, baking soda, baking powder, and salt.

Melt butter and sugar over medium-low heat.

 Remove from heat, and pour into a mixing bowl. With an electric mixer on medium-low speed, beat until mixture is cooled, 4 to 5 minutes. Add eggs one at at time (not whole as it looks like I'm doing in photo).

Add chocolate mixture and vanilla, beat until combined.

Then add half of the flour mixture, half of the sour cream, then the remaining flour mixture and the remaining sour cream. 

Mix until just combined.

Fill up cupcake tins about 3/4 full. 

Bake approximately 20 min. Allow to cool.

Here's my marshmallow cream. SOOOOO tasty! All it is: 1 cup of marshmallow fluff and 1 stick of room temp. butter cut into tiny pieces. Beat until butter is well incorporated.

Here's where I wasn't thinking. It really would have been best to fill these guys from the bottom, since I was doing a chocolate ganache. Be smart and don't make this mistake!

Ok, now for the ganache. Place 1 bag of semi sweet or dark chocolate chips in a bowl. Heat 2 cups of heavy cream in a small saucepan just until it starts to boil. Pour over chocolate and let it sit about 5 minutes. Then slowly mix chocolate...

Until it looks like this.


See why it's better to fill cupcakes from the bottom?

Dip cakes into ganache, allow them to drip free of excess chocolate.

Here's what your cupcakes will look like!

Now, if you want to make it v day appropriate, take some white chocolate melts and melt them down. Use a pastry bag with a fine tip to make little hearts. This is sort of difficult, that's why my hearts looks like a first grader did them. It may be easier just to buy heart-shaped candy to go on top.


Here's mine! Yours will look better because you won't make the mistake of filling them from the top. 


The sour cream add a nice tanginess to the flavor, and I LOVE marshmallow cream. Definitely a chocolate lovers dream.


Martha Stewarts Devil's Food Cupcakes

Ingredients

  • 3/4 cup unsweetened Dutch-process cocoa powder
  • 3/4 cup hot water
  • 3 cups all-purpose flour
  • 1 teaspoon baking soda
  • 1 teaspoon baking powder
  • 1 1/4 teaspoons coarse salt
  • 1 1/2 cups (3 sticks) unsalted butter
  • 2 1/4 cups sugar
  • 4 large eggs, room temperature
  • 1 tablespoon plus 1 teaspoon pure vanilla extract
  • 1 cup sour cream, room temperature
  • Chocolate Ganache Frosting
  • Chocolate Curls, for decorating (optional)

Directions

  1. Preheat oven to 350 degrees. Line standard muffin tins with paper liners. Whisk together cocoa and hot water until smooth. In another bowl, whisk together flour, baking soda, baking powder, and salt.
  2. Melt butter with sugar in a saucepan over medium-low heat, stirring to combine. Remove from heat, and pour into a mixing bowl. With an electric mixer on medium-low speed, beat until mixture is cooled, 4 to 5 minutes. Add eggs, one at a time, beating until each is incorporated, scraping down sides of bowl as needed. Add vanilla, then cocoa mixture, and beat until combined. Reduce speed to low. Add flour mixture in two batches, alternating with the sour cream, and beating until just combined after each.
  3. Divide batter evenly among lined cups, filling each three- quarters full. Bake, rotating tins halfway through, until a cake tester inserted in centers comes out clean, about 20 minutes. Transfer tins to wire racks to cool 15 minutes; turn out cupcakes onto racks and let cool completely. Cupcakes can be stored overnight at room temperature, or frozen up to 2 months, in airtight containers.
  4. To finish, use a small offset spatula to spread cupcakes with frosting.
Marshmallow Cream Filling:

1 Stick of room temperature butter
1-1 1/2 cup marshmallow fluff

Cut butter into 1/2 inch pieces. Combine fluff and butter, beat until butter is well incorporated. Pipe into the bottom of cupcakes, or cut holes in the bottom and add filling.

Here's Martha's Chocolate Ganache recipe. I sort of doubled it.

Friday, February 10, 2012

Valentine's Day Strawberry Angel Cake


Oh blog world, how I've neglected you! I cannot say I haven't attempted recipes for my blog, because I have. Last weekend, in fact, I attempted two types of candy, both resulted in a huge FLOP. Mostly due to the high humidity. At least I'm telling myself that.

Anyways...I figured it's almost V day, and whether or not you have a special someone to bake for, I think Valentines is an awesome excuse for more dessert!

So, I'm going to provide good vs. evil desserts for this occasion. Today I'm sharing the good. Strawberry angel food cake. Not only is it good because it's angel food, but it's also low fat. So, make this for the calorie conscious person in your life, and you'll score major points.


Start with a angel food cake mix. Betty Crocker or Duncan Hines will do. Most are just add water recipes. Easy. Or, make it even easier and buy an already made angel food cake.

I baked mine in two loaf cakes. I baked them on a cookie sheet just in case they overflowed. Which did happen. Once out of the oven, tilt them on the sides to loosen. Wait until cooled to remove.

Once cooled, cut your cake into 1 inch pieces, or close to it. Use a good bread knife (as seen) to make it easier on yourself.

Set your angel food aside for awhile. You'll need a 3 oz strawberry jello box, 2 containers of cool whip, and some frozen strawberries (or fresh works, if in season). 

Make the jello according to directions. Pour some of the strawberry juice from the frozen strawberries in, if you can. Allow jello to get thick in the fridge (about 30-45 min) just until it starts to thicken.

Whisk thickened jello, then fold in 1 container of cool whip and strawberries.

It'll look like this, kind of a hot mess, but it's okay.

Now you're going to make lasagna. Well, sort of. It is a layering process. I was clever and used a spring form pan so it would be easy to take out. You could also use a bundt pan. I don't have one of those. So start with your angel food pieces...

Then add a layer of jello-cool-whip mixture. 
..
And another layer of angel food followed by the rest of the mixture.

Then I topped with the remainder of the angel food.

Cover well with aluminum foil and saran wrap for at least 4 hours, to allow jello to set.

If you use a spring form pan, you can easily keep your cake form nicely when you release the spring. See?

Pretty cool, huh?


Now, you need that other container of cool whip. Use like icing to cover entire cake.

Pretty, huh?

You could top with fresh strawberries. I didn't have any, so I used sprinkles! 


Wouldn't this be cute for your valentine??


I found this recipe on the Duncan Hines website, here. This is a very easy recipe that will be quickly devoured by any guest. I made this for a youth leader meeting this past week and I only returned with one tiny sliver. That means it was good! You could even do these in individual ramekins for v day and impress your love. Plus, you won't feel guilty! Well, not too guilty. :)

Tomorrow I'll have the Evil portion of my valentine's dessert. That means devils food cupcakes with marshmallow cream filling and dark chocolate ganache icing. Anything but light!!


Thursday, February 2, 2012

Baked Macaroni and Cheese with Stewed Tomatoes


Motivation. Ever loose it? I did big time this week. Things got super busy and, even when they weren't, I couldn't find the motivation to get this blog done. Times when motivation is lacking go hand in hand with this type of recipe. Comfort food. 

After a rough week, what else do you need? Something warm and nostalgic is the best medicine for lack of motivation. Right? Actually, it's probably enabling your lack of motivation even more, but who cares (says the counselor)?


Here's what you need: 1 lb box of macaroni (I used orecchiette), 2.5 cups of milk, plus an extra 1/4 cup, 1 stick of butter, 1 tsp salt, 1/2 tsp black pepper, 4 tablespoons cornstarch, 1 bag of three cheese from Kraft  (8 oz or 2 cups), 1/2 block of extra sharp cheddar (4 oz), 2 cans stewed tomatoes, 1 cup of breadcrumbs (not pictured)

This is the cheese I used. You could do something different.

Boil pasta, strain and set aside.

In a large saucepan over medium heat, heat 2-3 cups of milk. I used low fat milk, and it didn't thicken as well as whole milk would have. But I didn't want those ridiculous extra calories. Also, the original recipe calls for 3 cups of milk, but I think you could get away with less. Add stick of butter and salt and pepper. Stir until butter is melted.


In a small bowl, combine 1/4 cup of milk with cornstarch and stir until dissolved, then slowly add to milk mixture, whisking constantly. Add cheese stirring until melted. Then combine pasta, two cans of tomatoes, and milk/cheese mixture, as well as 1 cup of seasoned breadcrumbs. Cut up blocks of cheese and place on top and sprinkle breadcrumbs across as well. 

Bake for 30-45 minutes, or until it looks like this!

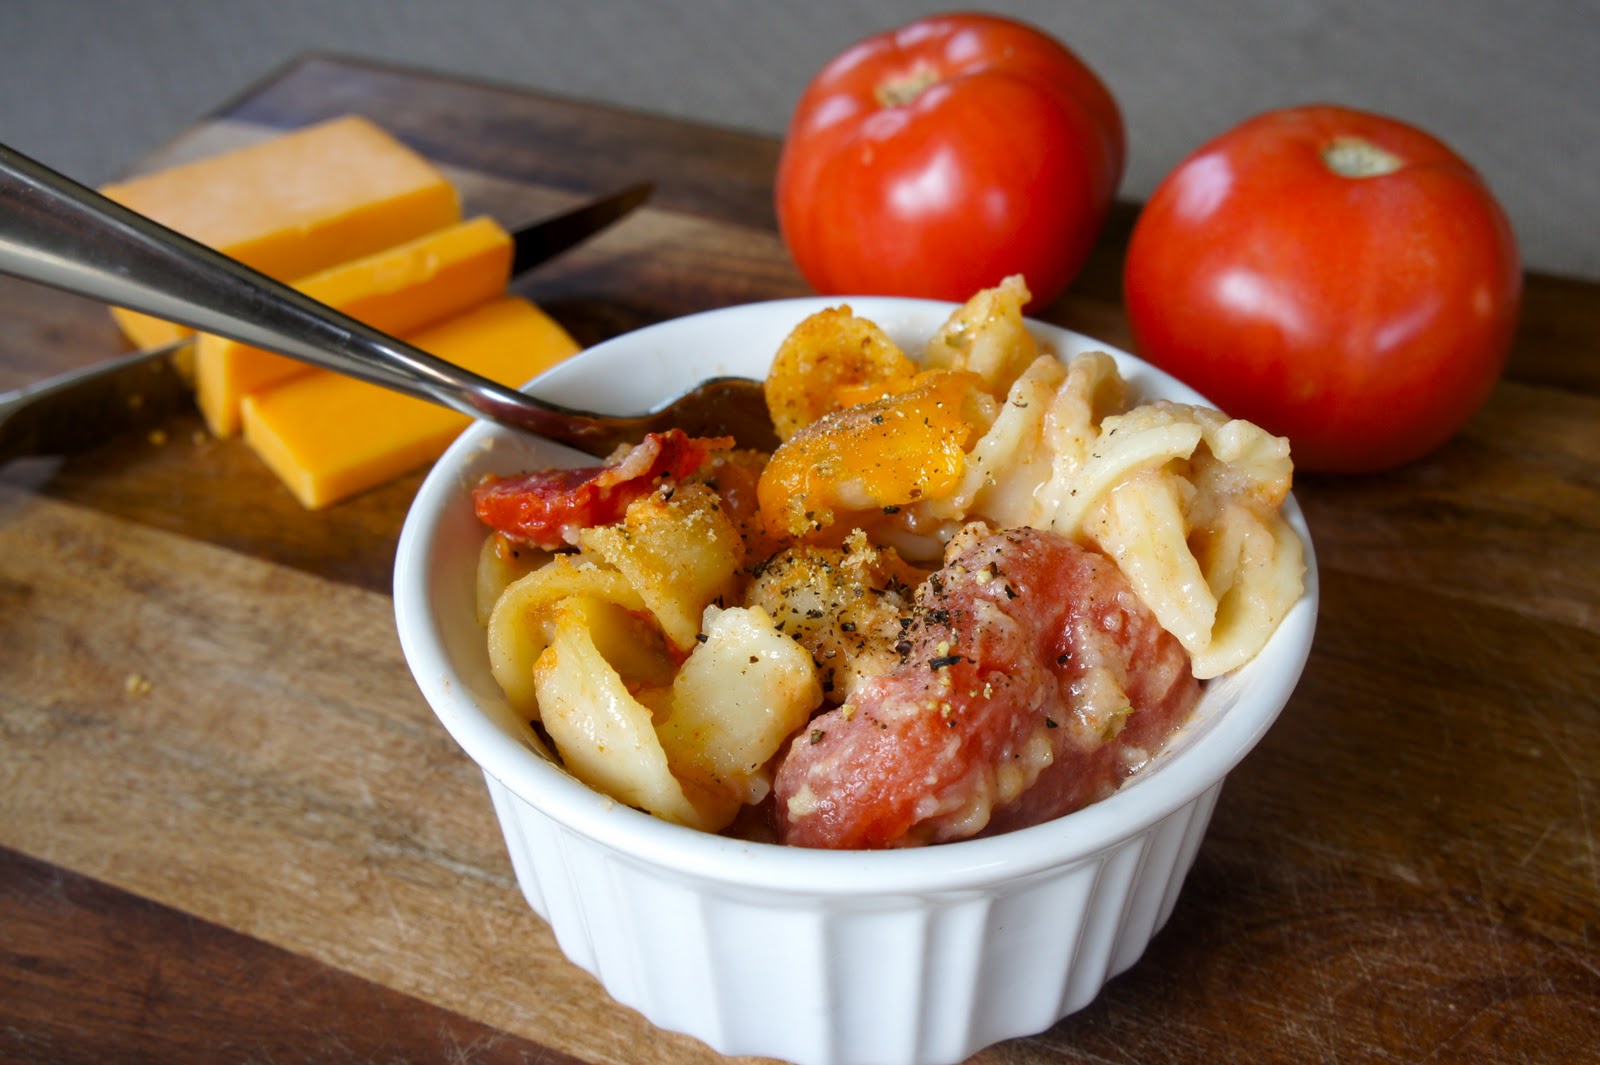
Those tomatoes are like hidden jewels in all that cheese. If you've never had stewed tomatoes alongside your mac n cheese, you are really missing out!

The sad thing about food blogging is that by the time I actually get the blog up, all the delicious food is gone. I miss it. So does my tummy.

So, this weekend, instead of reaching for the box-in-blue, try some homemade mac n cheese that will comfort even your worst day.


Recipe adapted with minor changes from food.com recipe found here

Baked Mac n Cheese with Stewed Tomatoes

Ingredients
1 (1 lb) box of pasta, I used orecchiette because that's what Shawn picked out
2.5 cups of milk, plus 1/4 cup
1 stick of butter
1 tsp salt
1/2 tsp black pepper
4 tablespoons of cornstarch
2 cups of Kraft shredded Three Cheese (or just sharp cheddar cheese)
1 cup of seasoned breadcrumbs, plus extra for sprinkling on top
4 oz of block extra sharp cheddar cheese, cut in 1 inch pieces
2 cans of stewed tomatoes

Directions:

Preheat oven to 350 degrees.
Cook pasta as directed on package in a large pot, strain and set aside.
In a large saucepan over medium heat, heat 2/5 cups of milk, butter, salt and pepper, until butter is melted.
In a small bowl, combine 1/4 cup of milk with cornstarch and stir until dissolved. Slowly add to milk mixture, whisking continuously.
When mixture has thickened, remove from heat and stir in 2 cups of shredded Kraft cheese until melted. Mixture may be somewhat liquidy depending on type of milk you use, but don't worry.
Using large pot you cooked pasta in, add pasta, cheese mixture, 2 cans of tomatoes, and 1 cup of breadcrumbs. Mix until well combined.
Pour into greased 9x13 baking dish and top with remaining cheese pieces and a sprinkle of breadcrumbs.
Bake for 30-45 minutes, or until cheese on top is melted and the top is golden brown.


Some people like to chop up the tomatoes some before putting them in, but not me. I enjoy finding the big pieces among my pasta. When I was little, the idea of tomatoes and macaroni was yucky, and I hadn't tried it since. I'm very glad now that I decided to revisit this recipe and I guarantee it will remain a comfort food fav through the years.